Introduction.
The Philips Vesta, Toucam and QC3000 pro all make good
astro imagers when modified to take long exposures. Much
of the reason for this is their use of Sony HAD or super
HAD CCD’s. These have greater sensitivity and lower
dark noise than similar CCD’s from Sharp etc.
However the super HAD is not the most sensitive CCD Sony
makes. The fabled Sony ex-view in its unfiltered form
boasts quantum efficiencies as high as 85% and a broad
response from blue to near IR. This chip easily competes
with latest enhanced blue Kodak offerings found in
expensive astronomical CCD cameras. In contrast to the
Kodak chips the Sony ex-view can be found in modest
security cameras. In 2001 Jon
Grove published details to convert the ex-view based
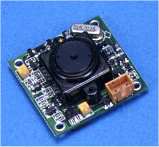
1004x board camera to take long exposures. This is
undoubtedly the most sensitive camera to come out of QCUIAG/ASTROCAM.
Over the following months the mod was improved further to
allow the full resolution of the CCD to utilised.
A small fly in the ointment.
While this camera has produced some great images it is
relatively demanding on hardware. The 1004x camera
produces up to 30 full frames per sec. Jon’s
modification does require a PC and video card capable of
analysing all the frames from the camera. This tends to
mean around 600Mhz+ processor and a PCI capture card.
Obviously this then excludes older laptops!
The answer?
This page contains details to use a 1004x-JG with a USB
Capture device and removes the need for a fast PC. The
additions to the normal JG mod are a board with some
logic chips and a line from the USB box to synchronise
the capture process.
How does it work?
The Hauppauge products are based on the NT1004 chip. The
data sheet is here.
The first thing to say is that it doesn’t offer a
magic solution of the limited bandwidth of the USB
connection. In the case of the modified webcams images
are collected at 640x480 from a 5FPS stream. This still
requires quite a lot of compression and it is fortunate
that image quality is a good as it its. Moving to 30 FPS
over USB means 6 times move compression and is not
supported by the NT1004.
The solution is to use twain capture. Here 2 consecutive
fields are collected in the USB capture box memory,
interlaced, then slowly, and without compression,
transferred to the PC. The trick is to make sure that the
fields collected by the twain capture contain an exposed
field. Despite having a good poke around in these devices
I have not found a signal which will indicate that a
capture is imminent. However, with the right bits of
logic, a signal can be found to indicate that the capture
has just begun. This means that an exposure can be ended
in time to get an exposed field into the second field
captured. If the 1004 is run in its most sensitive 2x1
binned mode then all that is required is to remove the
interlaced unexposed first image. For a full res image
the procedure is repeated to collect the second field.
A second benefit of this method is that it greatly
relaxes the timing accuracy required at the PC end as the
exposure end is now handled in hardware. So I hope we
will find that any USB enable PC or laptop will be
compatible.
You will need.
A 1004x camera, a Hauppauge USB winTV or USB live capture
device and
Start by modifying the 1004x. This is well described on Jon’s
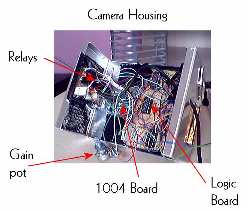
pages. The picture here
shows the connection points I have used. The gain pin
needs to be lifted if you would like to use manual gain control (a good
idea) also you will need 5V from the 1004X board to power
the gain circuit (do not power the logic board from this
5V supply).
The Amp+Vdriver supply, V3, Vh and amp lines need to
connected to the relay board which
is only slightly changed from the JG circuit. The
optional gain control circuit is simply this.
Next up is the USB device. From this we need 5V and 0V from the USB connector
and the NT1004 chips write line. The pin spacing on the
NT1004 is kinda close, the wire to this write signal is
better made at or close to the memory chip (pin 13), picture here.
Finally the logic board. The circuit diagram is here. Take your time with this as
any wrong connections can take a while to find. (Nb if
the relay board is disconnected from the control board
the camera should work normally)
After completing all the above you will have the most
sensitive unconventional astro imager ever connected to a
laptop! I guess you might then like some software to run
it! The package here is
simple, but I hope, effective. (Due to a small programming error
the program will not run as is. You will need to edit the
config.dat file that will be in the directory the program installed
to. Usually Program Files/Highlight. Use notepad to change
the second line to c:\ ).

|
Copyright
The novel information on this page is copyright. It is
forbidden to use this information for profit. Should you
receive any money as a result of performing this mod or
selling a modified camera send the money (less parts) to www.msf.org.
Over the last year I have received some requests from
people who are looking for a way round these
restrictions. I would like to take this opportunity to
specifically state that it not OK to give modified
cameras away free with other products nor is it OK to
charge people for you time when going mods for others.
Any individuals of companies wishing to produce
commercial products based on these modifications please contact me directly
smunch@clara.co.uk .
Please abide by these restrictions, as this will ensure
that future developments can disclosed in the same way.
Steve Chambers
|